

2024最新最全Linux 使用 Shadowsocks 设置教程
Shadowosocks-QT5
下面以 Ubuntu 64 位系统做参考,其他系统请参考 安装指南
第一步 安装 Shadowsocks-Qt5
按照下面的说明在 Ubuntu 上下载并安装 Shadowsocks-Qt5。
1. 下载客户端
| 【Shadowsocks-Qt5】 | 【历史版本】 |
2. 安装客户端
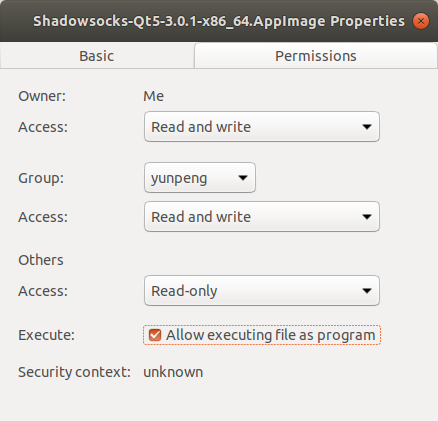
右键单击 “Shadowsocks-Qt5-x.x.x-x86_64.AppImage” > 选择 “Properties” > 单击 “Permissions” > 在”Allow excuting file as program” 上打勾。
第二步 获取 Shadowsocks 账号信息
详见:SS/ShadowsocksR 服务器节点 点击获取
第三步 配置 Shadowsocks 账号
在您的电脑上, 执行下列操作:
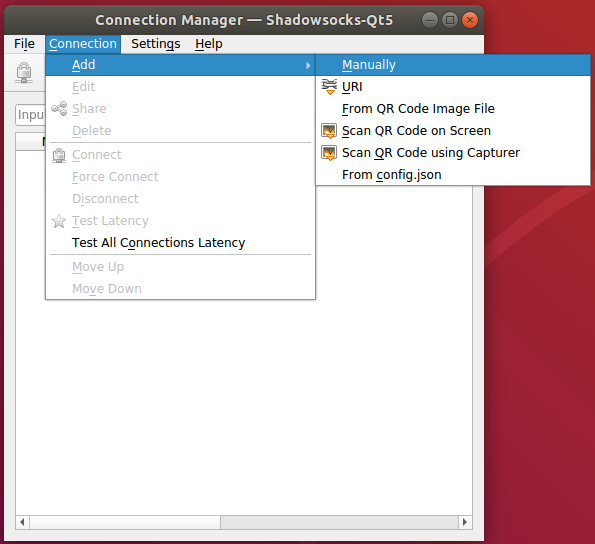
双击
Shadowsocks-Qt5-x.x.x-x86_64.AppImage> “Connection” > “Add” > “Manually”。
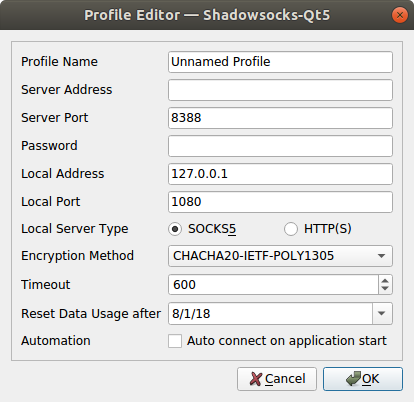
填写 “Server Address” (为你的节点服务器地址)> 填写”Server Port”(为你的服务端口) > 填写 “Password” (为你的登陆密码)。
在 “Local Address” 处填上 “127.0.0.1” > 在 “local Port” 处填上 “1080” > 选择 “Encryption Method” (为你的加密方式)。
勾选 “Auto connect to connect on application start”, 将会在开启 Shadowsocks-QT5 时自动连接至该服务器。
您也可以通过二维码方式单独增加节点,在您的计算机上, 执行下列操作:
此二维码同样适用于其他客户端。
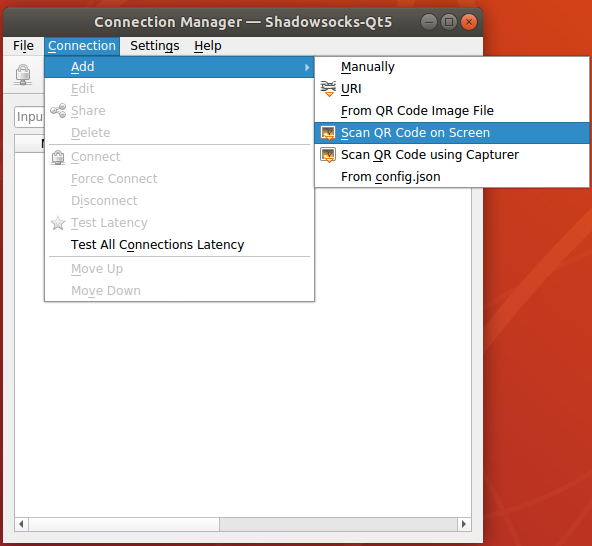
双击
Shadowsocks-Qt5-x.x.x-x86_64.AppImage> “Connection” > “Add” > “Scan QR code on Screen” > 当弹出新的 “Profile Editor”后,点击 “OK”。点击 “Connect” 图标 。
命令行客户端
1. 安装:
Python : https://github.com/shadowsocks/shadowsocks/tree/master#install
Shadowsocks-libev: https://github.com/shadowsocks/shadowsocks-libev#installation
下面我们以 Python 版的 Shadowsocks 为例
安装命令:
Debian / Ubuntu:
apt-get install python-pip
pip install git+https://github.com/shadowsocks/shadowsocks.git@master
CentOS:
yum install python-setuptools && easy_install pip
pip install git+https://github.com/shadowsocks/shadowsocks.git@master
For CentOS 7, if you need AEAD ciphers, you need install libsodium
dnf install libsodium python34-pip
pip3 install  git+https://github.com/shadowsocks/shadowsocks.git@master
Linux distributions with snap:
snap install shadowsocks2. 创建 Shadowsocks 配置文件
创建一个 /etc/shadowsocks.json 文件,格式如下
{
    "server":"服务器 IP 或是域名",
    "server_port":端口号,
    "local_address": "127.0.0.1",
    "local_port":1080,
    "password":"密码",
    "timeout":300,
    "method":"加密方式 (chacha20-ietf-poly1305 / aes-256-cfb)",
    "fast_open": false
}
3、启动 Shadowsocks
Python 版客户端命令是 sslocal , Shadowsocks-libev 客户端命令为 ss-local
/usr/local/bin/sslocal -c /etc/shadowsocks.json -d start4、终端内使用,需安裝 proxychains
Debian / Ubuntu:
sudo apt-get install proxychains编辑 /etc/proxychains.conf
修改最后一行
socks5 127.0.0.1 1080接着我们就可以直接 用 proxychains + 命令的方式使用代理,例如
proxychains curl xxxx
proxychains wget xxxx

sudo proxychains apt-get xxxx
5、其他程序使用
需要在程序内设置一个协议为 socks v5 的代理
服务器:127.0.0.1
端口:1080 #应与Shadowsocks客户端的本地端口对应,默认为1080
6、 关闭 Shadowsocks
在终端内输入
lsof –i:1080kill 相应的 pid 即可
小火箭作为一款优秀的网络代理工具,具备多协议支持、自定义规则等强大功能,为用户提供了更灵活、安全的上网体验。通过本文的详细介绍,相信用户对小火箭的功能和使用方法有了更全面的了解。在使用过程中,用户应当根据个人需求合理配置代理设置,确保网络连接的稳定和安全。未来,随着技术的不断发展,相信小火箭将会迎来更多的更新和改进,为用户提供更出色的上网体验。更多相关资讯教程,请关注小火箭id平台。